Hey guys this is ANONYMOUS India from XDA(Junior member)
This is a guide which tells you how to make a your very own bootanimation and install a bootanimation on your device.
plz let me know if you made a bootanimation using this method so that every bootanimation made using this method can be posted here
Bootanimation- what is it ?
Prerequisites
1-you need a bootanimation.zip file [you can find them on google]
now if you have downloaded the bootanimation.zip file ,open it up
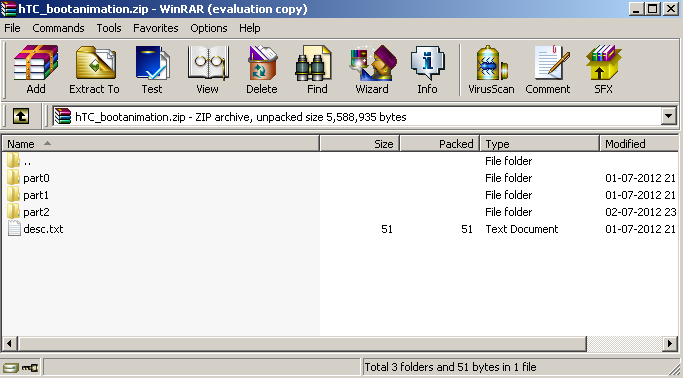
2- as you can see in the picture you find some folders in it named
and a desc.txt file .
EXPLANATION OF desc.txt
Fire it up el captain !!
we'll start making a bootanimation from scratch from here
#1-create a folder anywhere put in desktop for ease,let's call it
#2-open the folder and create another folder name it
#3- With part0 created, it's time for you to start creating an image. To make it simple for beginning we'll make a simple one .So, using Photoshop as an example, create a new image which is the resolution of your handset. [like if ur on htc explorer use 320X480 or galaxy mini use 340X320] (if u don't know your device's resolution google it
#4-Give a black background to the image and take a image you wan't to fade in . paste it as a new layer and set the layer to 0% opacity
so now you can only see a black background.
#5-now save the image in your
and name it
#6-now increase the opacity of your bootanimation by a narrow degree say 6%.now save it as
in the part0 folder
#7-repeat step 5 every time until you reach 100%.and each time save it as image003-image004 etc. in part0 folder
#8-open notepad and type this --
Thanks to @cisza for this info.. [images will be updated soon ]
#9- save it as :
in the root of your bootanimation folder (not in part0)
#10- compress it using your archive manager say 7zip ;winrar,etc.
imp: SET COMPRESSION METHOD TO STORE
or else bootanimation WON'T work
congrats u just made a boot animation... and remember to share with us your bootanimation
You can also use boot animation factory by RD despotovski01 It may help you with debugging and previewing and also creating bootanimations
Installing bootanimations
To install your bootanimation just use root explorer to put it in system/media folder
if using htc stock rom put it in system/customize/resources folder (make sure to rename it the bootanimation.zip to htc_bootup.zip )
ENJOY
This is a guide which tells you how to make a your very own bootanimation and install a bootanimation on your device.
plz let me know if you made a bootanimation using this method so that every bootanimation made using this method can be posted here
#This guide assumes that you are windows user and have -
  1- 7 zip or winrar installed
  2- a image editing software (for ex-photoshop)  #
| Bootanimation basically is a collection of .png pictures that are projected on the screen one after the other quickly so that it looks like a animation , stored in a zip file |
1-you need a bootanimation.zip file [you can find them on google]
now if you have downloaded the bootanimation.zip file ,open it up
2- as you can see in the picture you find some folders in it named
"part0" "part1" "part2"
| EXPLANATIONS folders like part0;part1,etc. STORE .png pictures of bootnaimation the desc.txt file contains all the necessary info to run bootanimation like resolution fps ,etc |
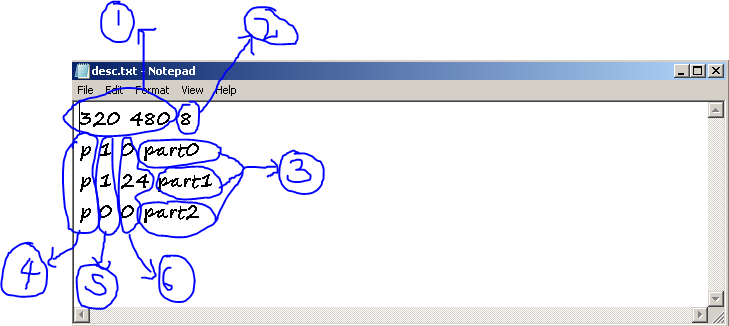
As you can see in the image
   #1-it is the resolution of the bootanimation(you should basically use your device's resolution for ex - in the pic it is 320X480)
   #2-it is the fps(frames per second) of your bootanimation [higher the no. faster will your bootanimation play a standard fps should be 30]
   #3-these are the folders which contain images for your bootanimation
   #4-it is a pointer to tell it to look at new commands
   #5-specifies the no. of times this section of bootanimation will play ( 0 means infinite)
   #6-defines pause in seconds before repeating or moving on next line (o means no pause 10 means 10 sec pause)
Fire it up el captain !!
we'll start making a bootanimation from scratch from here
#1-create a folder anywhere put in desktop for ease,let's call it
bootanimation
part0
#4-Give a black background to the image and take a image you wan't to fade in . paste it as a new layer and set the layer to 0% opacity
so now you can only see a black background.
#5-now save the image in your
part0 folder
image00.png
image002.png
#7-repeat step 5 every time until you reach 100%.and each time save it as image003-image004 etc. in part0 folder
#8-open notepad and type this --
1080 240 24
p 1 60 part0
c 1 0 part1
c 0 0 part2

c means that the entire part of the animation (eg part2) will be played even if bootup completes.
change the 1080 240 with the resolution you are using
#9- save it as :
desc.txt
#10- compress it using your archive manager say 7zip ;winrar,etc.
imp: SET COMPRESSION METHOD TO STORE
or else bootanimation WON'T work
congrats u just made a boot animation... and remember to share with us your bootanimation
You can also use boot animation factory by RD despotovski01 It may help you with debugging and previewing and also creating bootanimations
Installing bootanimations
To install your bootanimation just use root explorer to put it in system/media folder
if using htc stock rom put it in system/customize/resources folder (make sure to rename it the bootanimation.zip to htc_bootup.zip )
ENJOY
PEACE...
No comments:
Post a Comment